Hello, there is a post on tumblr herethat shows you how to make offering stones. They are beautiful! But additional reblogging of the post included mentions that baking soda is not safe for nature. So I tried to come up with a different type of offering stone that isn’t harmful. I attempted several experiments before I finally remembered making gingerbread ornaments as a kid that were not edible. The recipe I have for you is simple, completely environmentally safe and it will not mold over time.
Cinnamon Offering Stone Recipe:
¾ cup of applesauce
4 ounces of Cinnamon (about two jars from a grocery store)
Put the applesauce in a bowl and slowly mix in the cinnamon a little at a time. It will eventually start to thicken and ball up into a dough that you can form with your hands.
I added some herbs and flowers that I have dried myself just for an extra touch (although the cinnamon stones are a sufficient offering themselves) Pictured are thyme, rosemary, peppermint, roses, sage (leaf and flower).
Preheat your oven to 200° (fahrenheit) and bake them for 2 hours.
It’s up to you what size/shape you make them, so get creative! I made mine smaller (an inch to inch and a half) and made circular and heart shapes. I was able to get 33 cinnamon stones. (Added tip: if you have a spot in your grocery store where you can buy “bulk” spices and measure your own, I suggest getting the cinnamon there. I was able to get 4 oz for about $3.15 which I know is cheaper than if I had purchased two jars of it.)
I am so glad these turned out this wonderfully! It really bummed me out when I found out the other recipe was no good. I wanted something that I could give back to nature if I take something (such as a rock or herb). You can leave these as a thank you or you can also offer these to a god or goddess.
The most important thing is that these are totally safe for the environment!
I’ve been scouring pinterest lately for witchy crafts, and here are some I’ve found, along with what I would use them for!
Wall Hanging – Okay so I made a really cool wall hanging for someone a while ago, and with their permission, I enchanted it to bring motivation, happiness, and warmth to their space. I feel like you could do the same with any wall hanging. I added braids, chestnut halves, and even color coordinating yarn to make mine.
Star Light Garland – Great for Cosmic Witches! Or for those of you who need a little light around your altar, around your bed for soft light, etc.
Flower Candle Holders (Plaster Dipped Flowers)– Yes, you can buy these already made, but aren’t the ones linked so awesome? I think it makes perfectly preserved flowers to keep all year, and the flame of the candle might help draw their energy out!
Concrete Dragon Egg Candle Votives – While we’re on the topic of candle holders, why not take a look at these amazing ‘dragon egg’ ones? If you work with dragon spirits, or really any animal/creature spirit with eggs, it will look amazing on your altar!
Watercolour Painted Pillow – For all of you who use magic to work your way into your dreams, or are looking for a fun way to calm yourself before bed, try this! You can even paint it with moon water!
Dream/Wish Jar – All you have to do is write down your dreams/wishes on the paper of your choice, and throw them in a jar. I suggest making matching sigils for each one, and burning them at the full moon. I made one, and it looks so cute in my room! Super great for hidden witches!
Moon Rocks – I know, I know, not exactly a moon rock, but if you make these with moon water in place of regular water, and charge them under the full moon, they could stand in for the moon on cloudy nights, charge your crystals, etc.
DIY Essential Oil Diffuser Necklaces – Obviously, this is a really inconspicuous way to use essential oils! You could wear one for protection when you’re feeling unsafe, attract love on the days you want too, and even give them away as gifts to other witches!
DIY Detoxifying Activated Charcoal Soap – Okay, but how much witchery could you do with these? So much!! After you are finished cursing, or perhaps on the night of a full moon, you could scrub up with this and get all kinds of cleansed!
Ombre Mermaid Soap – All the yes. Sea witches could use this in Mermaid beauty bath spells, or give it up as an offering! They’re so pretty, and with a little enchantment, could be magical!
Jellyfish in a Bottle – Do you interact with spirits of the sea? Maybe Jellyfish? Then go ahead and capture their beauty with this awesome DIY, and use the bottle as a spirit vessel for your jellyfish guests!
Mini Natural Brushes (Brooms) – These are great for on the go witchery, or for painting out your spells. You can keep dried ‘brushes’ in mini altar kits to use as a besom, or use them as brushes for making sigils, etc.
Lay-Flat Storage Mat – Divination Supplies, witchy spell kits, enchanted jewelry- the opportunities are endless! Use black to keep the energy locked inside, and paint or draw sigils on it for an added boost!
DIY Hand Cast – Make your own palmistry guide using this neat craft. You can cast your hand and paint on it however you’d like!
Pressed Flower Candles – Preserve the beautiful energy of almost any flower by creating a candle with it! Burn the candle when you need the herb or flowers energy for your spell, and Make as many as you can while the flowers are blooming!
Wind Chimes – Perfect for alerting you of potential intruders, Wind chimes placed inside can add a natural, as well as witchy, flair to your space. If you hear it, but there is no wind, you’ll know someone has come to visit!
DIY Candles – Add your energy as you make these candles for a boost in your spells. There’s even a ‘Sprinkes’ candle you can enchant to grant wishes, and you can light this every year on your birthday.
Bird’s Nests – Yes, you can make a nest of your own! Using special herbs, you can make a home fit for a spirit, or use it as a shrine to the Air element.
Wooden Spoons (Personalized) – With a wood burner and some concentration, you too can make a Kitchen Wand! Enchant soups and pastas with special energy with your very own wooden Spoon Wand!
Gazing Ball – So, this isn’t exactly a crystal ball, but it will work just like a scrying mirror. Simply follow the directions, and, if you wish, exclude the additions to the sphere. Then, you’re good to go!
DIY Succulent Planters – Green witches, I got a DIY for you, too! Make these succulent planters, and put them near a window, especially if your altar is near by. They’ll provide protection and hardiness to your home and its defense systems!
Crystal Candle Votives– These crystals are 100% made by you. You can give them special intentions and colour them accordingly. Have fun making your own set of crystals!
Paper Leaf Garland – A little bit of nature for your altar! I know it isn’t real, but for those of you who can’t grow a plant near your altar, it will work beautifully!
Wish Bracelets – I loved mine when I had it! They’re super fun to wear, and will be a discreet witchy project for you to try. Just make a wish, and wait for it to fall off!
Rustic Twig Ornaments – Use these as wards throughout your home, and enchant them to bring you whatever you need.
Button Bicycles – To help your spell get going, throw in a button bicycle! Use it inside poppets, sachets, etc.
Packaging Tape Image Transfers – These can help you label your herbs, crystals, and spell jars! Have fun coming up with cute designs and whimsical fonts!
Paper Envelopes – For those of you who send letters, write them, or use envelopes in your spells, you can create them using paper with this method!
Witch balls have been a part of pagan tradition for many years. Their purpose is to protect the home and its inhabitants from evil and harm. Traditionally, you made a witch ball every year to seal fortune and protection for the next twelve months. You can hang this ornament in a window, over a doorway, in a bedroom or even outdoors; wherever you feel it would serve its purpose the best. It would look lovely as a Christmas or Yule decoration as well!
You can purchase empty ornaments and bottles from craft stores, or re-use old light bulbs for this! Fill it with the following:
Sprigs of Lavender to encourage a calm, peaceful environment
Chamomile Flowers to aid in relieving anxiety
Yarrow, Roses and Rose Quartz crystals to encourage self-love and love in relationships
Jasmine Flowers to attract wealth and sweet dreams
Cinnamon to draw happiness and comfort
You could also include:
A seashell and a shark tooth to incorporate the magic of the sea
i. Gather old documents or newspaper and rip them into small pieces, cover with water and stir thoroughly. This mixture can be left overnight (or carefully heated) until the pieces dissolve into a pulp. The longer it’s left and more frequently it’s stirred, the smoother it will be
ii. Once most of the water is absorbed and it looks pretty mushy, add a few drops of essential oils and combine the herbs or flower petals (if desired). Squish the last bit of liquid out with your hands and begin assembling the shape on an old or dark coloured towel
iii. Sandwich the sheet by folding the towel or placing another on top and press down firmly, flip over and repeat on a dry section. After a few times extra newspaper can be used. Leave it to dry overnight (or for a few days). Once they’re nearly dried place the pages under a heavy book to keep them flat
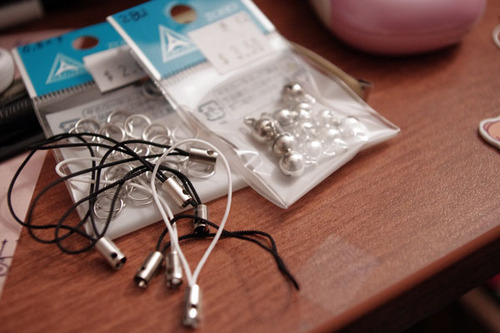
I know a ton of you have been waiting for this one. Teaching you to make your own plastic keychains!
To start off, I think the biggest question everyone has is what I use to make them. I work with shrink film. You might be familiar with Shinky Dink brand shrink film as a kid. I use Grafix brand white inkjet shrink film. The inkjet kind is relatively pricey compared to the regular kind. If you’re using regular, I don’t recommend you stick it in your printer. Sharpie markers would be good for that.
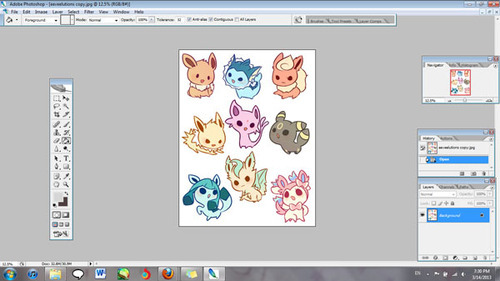
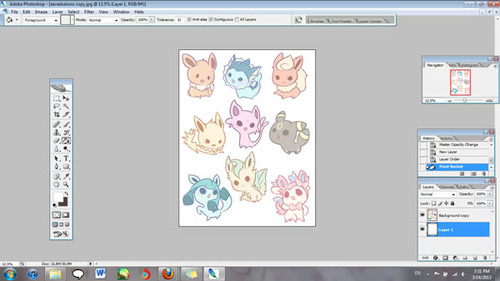
Alright, now open up the file with the images that you’re working with. Make sure your images are a lot bigger than you want your finished product to be since they shrink significantly.
You’ll also want to lighten the opacity to about half. I go somewhere between 50-60%.
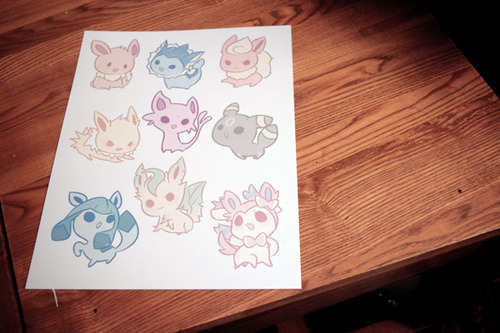
Now print your image out! I’ve found that it works best for me when I have it at the plain paper setting, and standard print quality.
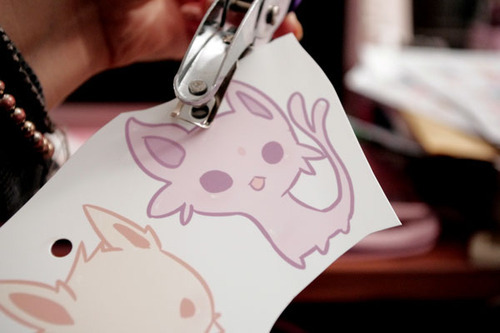
Holepunch with a ¼" holepuncher BEFORE you shrink them. It’s so much more work to have to punch holes when your plastic is thick!
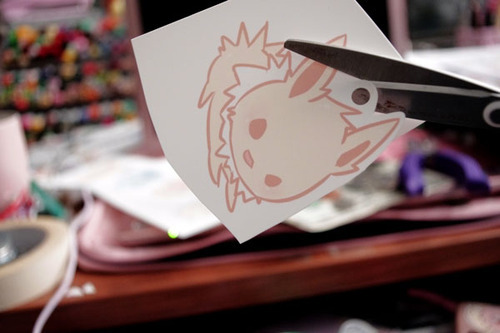
Cut out your design, leaving the amount of border you want.
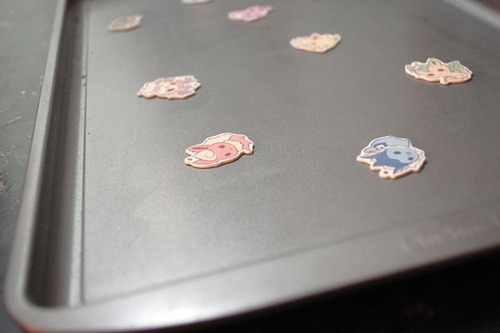
Set them on a tray for convenience. An aluminum foil sheet works too, but I recommend cookie trays because they are easier and quicker to get out of the oven.
Preset heat. Your shrink film package will tell you what temperature to set it at, but I find that it isn’t always accurate for me. I generally set temperature to 350 degrees or so.
Put them in the oven. Remember to keep track of time! I leave them in for about a minute and a half.
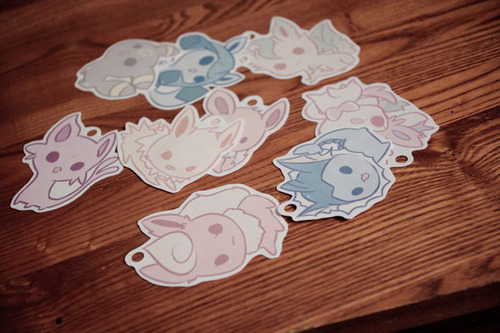
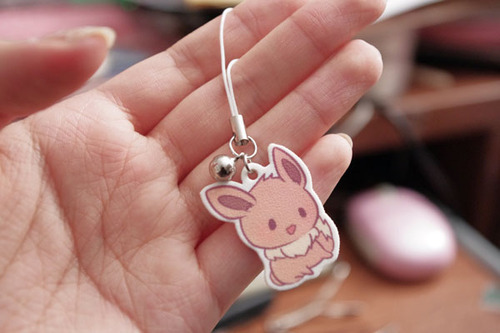
After time is up they should be super small! Magic!
If your charms are not flat, put something heavy on it right out of the oven when they are still hot and malleable.
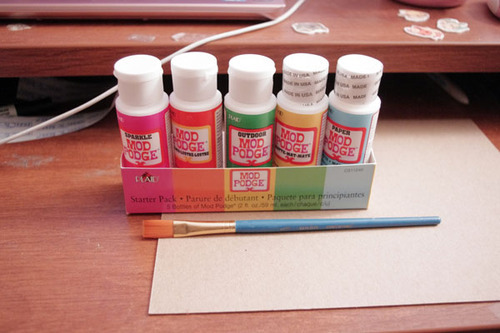
If you’d like to, you can seal them now. In my last two batches, I used clear topcoat nail polish. The problem with that is that I need between 3-5 coats of it, and it takes a while to dry. I’ve been experimenting with modpodge.
For lariats, you can use jump rings or lobster clasps.
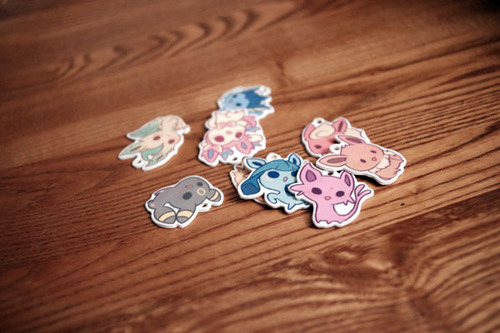
Here is one that I made that wasn’t sealed. The finished texture after shrinking is a little bit rough. There’s nothing wrong with leaving them unsealed, but because they are inkjet printed, the colors wash right of without protection.
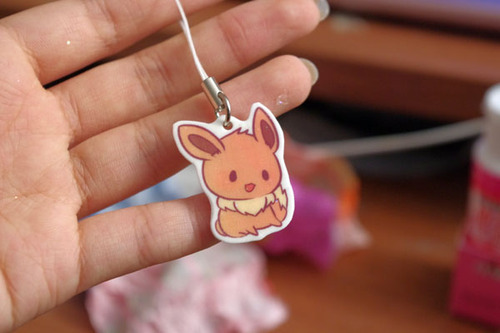
This is one that was sealed with modpodge. The colors become a little more vibrant and smooth and water resistant. Things often get stuck on when applying or drying so be careful.
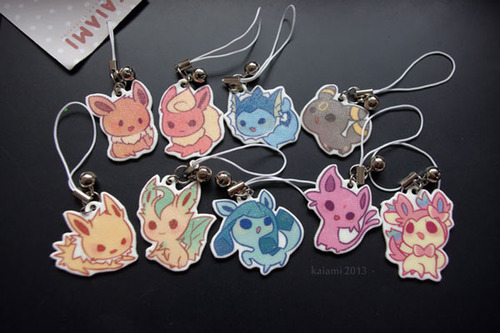
These ones down here were sealed with clear nail polish. They come out shiny if you put enough coats, but the grainy texture will still be there.
Well, there ya go! Have fun making your own keychains!
fullten dunno how in to DIY you are, but this seems like a way to get more cute things in your life.
This is super cute
I do this!! You can also glaze them with Mod Podge Dimensional Magic! It gives it a nice, shiny surface. Resin would work too, and it would be more durable.
Back at the end of October, @swampseer, @upthewitchypunx, & I chatted briefly about the concept of having a particular jacket as a piece of armor to wear when engaging with the world.
The discussion about it was fairly short, since we were having a larger conversation, but I feel like ESPECIALLY now, a discussion of ways to build armor or protection magically would be especially welcome.
I’m not a great person to start this discussion, since I’m currently in the phase of saying “I want the thing!” without actually having done my thought about how to create it, but I invite others to join in a help brainstorm about this. (Maybe show off your armor if you already do this?)
A couple of ideas off the top of my heard are:
sewing/emboidering sigils onto your coat (or whatever you’re using as armor)
writing words of power or empowering statements, maybe onto patches, and adding those to the lining of your coat (maybe statements from friends or loved ones? things that give you courage or make you feel strong!)
enchanting or building a strong glamour into your coat/armor so you’re less visible as a target to those who might want to confront you about your race/sexuality/gender/etc.
Thoughts, comments, & ideas are welcome! ♥
Sewing little pockets with buttons inside jackets that you can stick talismans, charms, or stones so that it is interchangeable. But ya, enchanting the whole things is great.
I have done this!
my first denim jacket I spent 30+ hours dyeing, sewing lace and patches, and rhinestoning … I had a collection of pins and buttons from family and friends over the span of a decade. (time spent, crafting, and gifted talismans are all part of my Crafting).
sadly, it got lost, but I have a second one I wear now that has also been dyed/sewed … just collecting more talismans for it. 🙂 (excuse the glammy photo, it/me was photographed for a promotional thing at my last crafty job, hah!)
I definitely considered it a magical talisman. I have other jewelry I always wear when leaving my home (some that I do not take off) that is much the same.
Oh wow! THIS IS GORGEOUS. ♥
Was it just plain denim and then you dyed it? I really love the multicolored effect. Thank you for showing us. ♥
I’ve been working on this for a while, I’ve got the studs/spikes and major patches attached but I’m still undecided on the remaining small patches and pins, there’s others I’m considering but this is what I dug up for now.